Mastering Exposure Values (EV) for Realistic 3D Renders: A Comprehensive Guide
Creating realistic 3D renders is both an art and a science. One of the most critical aspects of achieving realism is understanding and controlling Exposure Values (EV). Whether you're working on a daylight scene, a moody indoor environment, or a night-time setting, adjusting the EV can make or break your render. In this blog post, we’ll dive into the nuances of EV, how they interact with emissive materials, and how to fine-tune your scenes for stunning results.
What is Exposure Value (EV)?
Exposure Value (EV) is a numerical scale that represents the combination of shutter speed, aperture, and ISO to achieve a properly exposed image. In 3D rendering, EV is used to control the brightness of a scene, mimicking the behavior of a real-world camera. The higher the EV, the brighter the scene, and vice versa.
For a quick reference, you can check out the Exposure Value table on Wikipedia, which provides EV for various lighting conditions: Exposure Value – Wikipedia.
Why Adjust EV for Emissive Materials?
Emissive materials, such as lights or glowing objects, can easily get lost or appear underwhelming if the EV are too high. For example, a daylight scene with an EV of 13 (cloudy bright with no shadows) might wash out emissive effects. To make emissives stand out, you’ll need to reduce the EV. Here’s a breakdown of recommended EV for different scenarios:
- Daylight outdoor scene (no emissives): Use the default EV of 13.
- Daylight outdoor scene (with shadows or emissives): Set the EV between 8 and 10.
- Night outdoor scene: Set EV between 7 and 10.
- Indoor scene with environment map influence: Set EV between 6 and 8.
- Closed indoor scene (no environment map): Set EV between 4 and 7.
These are starting points—feel free to experiment and adjust based on your specific scene and lighting conditions.
The Relationship Between EV and Environment Map Intensity
When you adjust the EV, you also need to consider the Environment Map Intensity. A simple rule of thumb is: for every point you reduce the EV, divide the Environment Map Intensity by 2. For example:
- EV of 12 → Environment Map Intensity = 0.5
- EV of 11 → Environment Map Intensity = 0.25
- EV of 10 → Environment Map Intensity = 0.125
This ensures that your environment lighting remains balanced and realistic as you tweak the exposure.
The Pitfall of Amplified Lights
Some 3D products come with artificially amplified lights to make them work with the default EV. While this might seem convenient, it can lead to unrealistic results. As an artist, it’s better to use realistic light values and adjust the EV and Environment Map Intensity accordingly. This approach may require more effort, but it pays off in the form of more authentic and visually appealing renders.
Real-World Examples
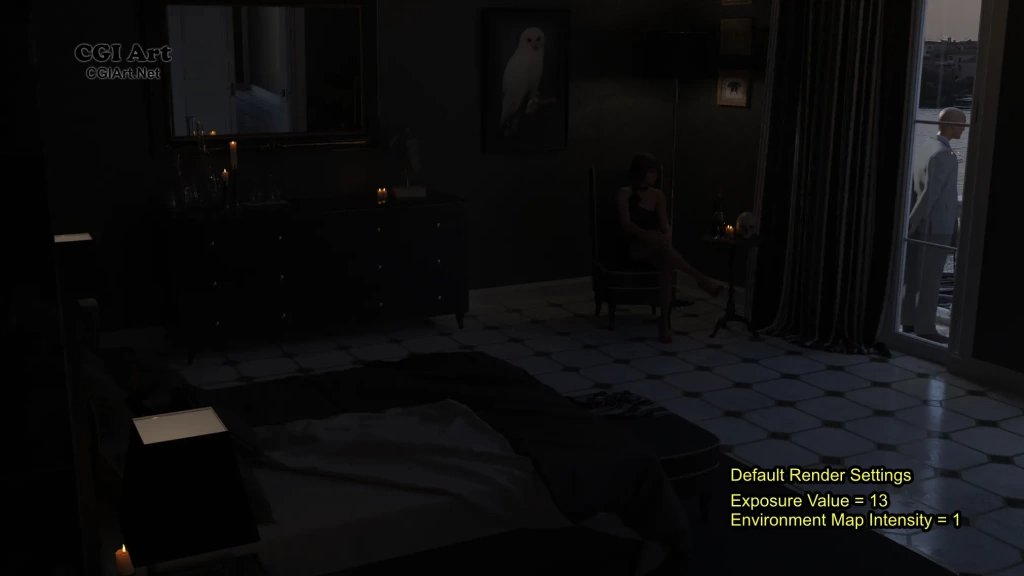
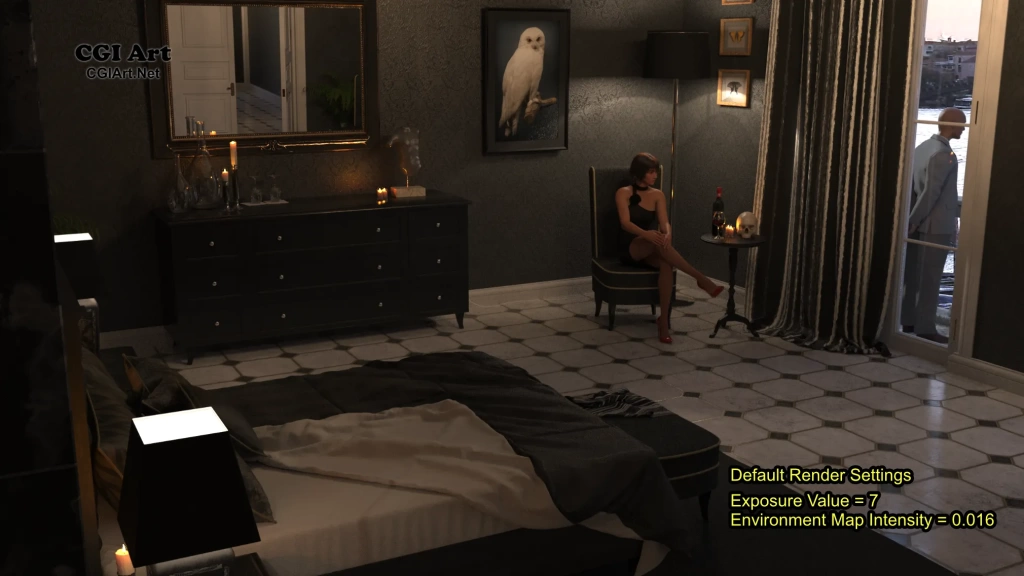
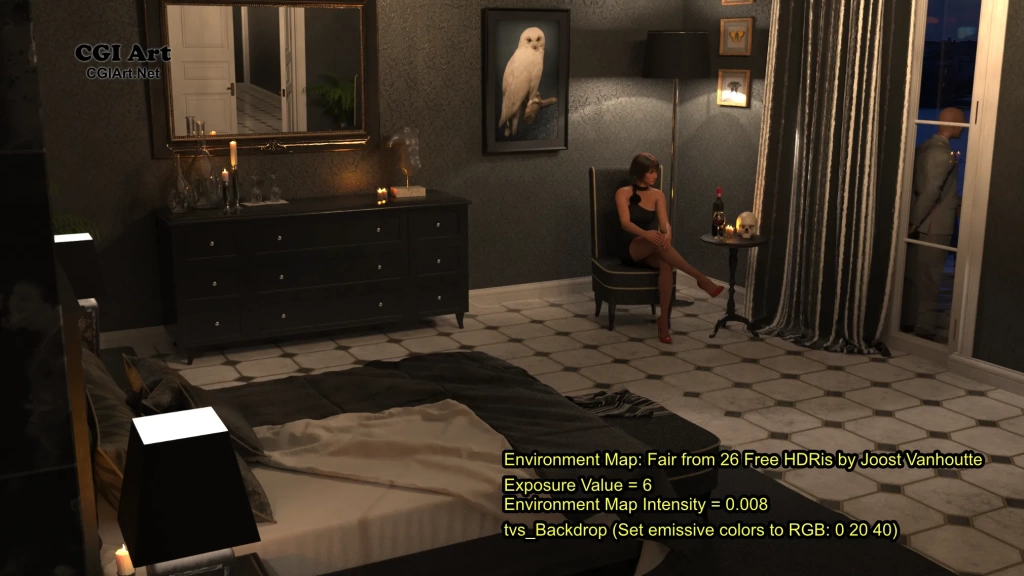
Let’s look at a few examples to see how adjusting EV and Environment Map Intensity can transform a scene. The products used for the examples are the Containment Zone and The Venezia Suite.
1. Containment Zone
- Default EV of 13: The emissive materials are barely visible, and the scene looks underexposed.
- Adjusted EV to 8: The emissives pop, and the overall lighting feels more balanced and realistic.
2. The Venezia Suite
- Default EV and Environment Map: In the first image the interior is too dark, and emissives don’t appear to work.
- Daylight Version (EV = 7, Environment Map Intensity = 0.016): In the second image the scene is darker but more realistic. Further adjustments to ISO and White Point can refine the lighting.
- Night Version (EV = 6, Environment Map Intensity = 0.008): By replacing the default environment map in the third image with a night version (Fair from 26 Free HDRIs by Joost Vanhoutte) and tweaking the emissive colors for the backdrop (tvs_Backdrop, set emissive colors to RGB: 0 20 40), the scene transforms into a convincing night-time setting.


Tips for Fine-Tuning Your Renders
- Experiment with ISO and White Point: These settings can help you fine-tune the brightness and color balance of your scene after adjusting the EV.
- Use Reference Images: Compare your renders to real-world photos to ensure your lighting looks natural.
- Test Emissives Early: Check how emissive materials behave in your scene as soon as possible, and adjust the EV accordingly.
- Leverage Post-Processing: Tools like Photoshop or GIMP can help you tweak brightness, contrast, and color balance after rendering.
Conclusion
Mastering Exposure Values is a game-changer for 3D artists. By understanding how EV interacts with emissive materials and environment lighting, you can create renders that are not only visually stunning but also true to life. Remember, the key is to experiment and adapt—every scene is unique, and there’s no one-size-fits-all solution.
This post was made possible by the knowledge and tips provided publicly, over the years, by ile-avalon and ile-avalon.
What are your favorite EV settings for different lighting conditions? Share your thoughts and experiences in the comments below!


